Now that we’ve introduced the concept of counting or signal noise, we are in a position to also discuss graininess and its relationship to image sharpness. The important point to remember from our discussion of counting noise is that because of the random nature of the incoming photons of light, the intensity of even a uniform intensity surface will show pixel-to-pixel variation.
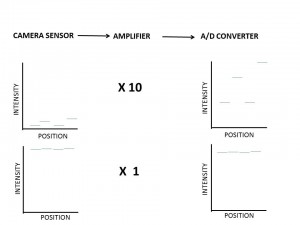
 Now your digital camera may be thought of as having three components as illustrated in the schematic shown at the top of Figure 1. These three elements are:
- A sensor that builds up electrons in response to the light (subject to the laws of randomness that the lower the number the more the variation). The individual pixel elements are miniature capacitors, which means that they produce a voltage directly proportional to the number of electrons and therefore the intensity of light,
- An electronic amplifier that can multiply your voltage and increase its size
- An analog to digital (A/D) converter that converts the voltage to a digital number that can then be stored either on your camera or on your computer.
Now, below this schematic on the left hand side I’ve drawn a little graph that shows intensity from four pixels in your image, presumed to be of the same light intensity. However, because the intensity is low there is lots of variability, due to counting noise. Also because the intensity is low it’s going to appear black or near black in your image. So, we have to amplify it, say by a factor of 10 X. This brightens things up. However, as shown on the right hand side, the variability gets amplified as well. This is what we call graininess in an image. Also, as we have previously discussed, this kind of noise limits our ability to distinguish things in our image. So the resolution isn’t so good.
To overcome this problem, we can instead lengthen the exposure, which fills the pixels with more electrons and jacks up our overall intensity. That is we need to use no, or less amplification. This is shown at the bottom of Figure 1. Less variability means less variability or graininess and better resolution.

Figure 2 – Increasing electronic amplification or ISO causes image graininess and reduces image sharpness
So you need two camera controls here. To control how much you fill the pixels with electrons you need to be able to either expose for longer time or decrease the f-number. When you cannot do this, because you need a high f-number for depth of field or faster exposure to stop action or hand motion, you need to be able to control the amplification. That’s your ISO setting. The higher your ISO the higher your magnification. In the old film days, an ISO of 100 was considered to be normal, high ISO films were fast, high grain films; low ISO films were slow, fine grain films.
Let’s take a look now at the images of Figure 2. Don’t worry about the slight color differences between top and bottom. The top image was taken at ISO 100 (low electronic amplification). When you blow up the caroler’s face there’s very little variation or grain, the sharpness is quite good. The bottom image was taken at ISO 6400 (high electronic amplification). When you blow up the caroler’s face There’s a significant amount of variation or graininess, and, as a result, there is a loss of sharpness or resolution.

Pingback: More Secrets of Charge Coupled Devices | Hati and Skoll Gallery
Pingback: Are full frame DSLRs superior to APS-C cameras? | Hati and Skoll Gallery