Let’s continue our discussion of the technical basics of photography, building upon our discussions of the pinhole camera. As we’ve seen, pinhole cameras require tiny pinholes to create sharpness. As a result, they collect very little light. How do we solve this problem?
Well, I’m sure you know the answer. You use a lens to collect the light. It’s kind of like trying to drink rain. If you open your mouth to collect rain drops you catch very few. You need a funnel with a very large aperture. Lens are light funnels. The bigger the lens the more light we collect.
In photography this relates to the concept of f-number. The bigger the lens the smaller the f-number and the more light it can collect. Functionally, if you have a dim scene to photograph, you decrease the f-number. The bigger the lens the further down you can go. Significantly, what is important in optics is not the absolute size of the lens aperture, but the ratio of the focal length to the aperture, the f-number.
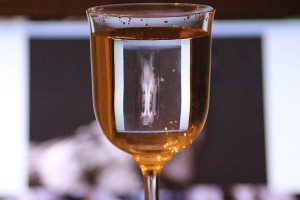
Figure 1 – Refraction causes a glass of wine to bend and partially focus light
In Figure 1, I use a glass of wine as a lens to focus my wolf picture. Because the glass is more curved in one direction than the other the image is smaller in the horizontal direction than the other. But importantly, we observe the bending of light as it moves from air to wine. This bending is referred to as light refraction.
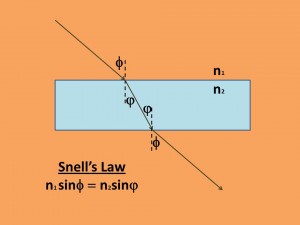
Figure 2 – Light refraction obeys Snell’s law
Refraction is described by Snell’s law or Snell-Descartes’ law. Descartes (1596-1650) is best remembered for his famous statement: “I think therefore I am.” The Snell part refers to the Dutch Astronomer Willebord Snellius (1580-1626). Interestingly, it was first described and used by the Arab scientist Ibn Sahl in 984. Snell’s law describes what happens to light when it moves from air into a denser medium. Transparent media are described by their indices of refraction, let’s call them n1 for the air and n2 for the wine. Referring to Figure 2 we see that when the light ray in the first medium strikes the surface of a medium of higher index of refraction it is bent towards the normal (the dashed line perpendicular to the surface). When it comes back out it bends back away from the normal and is parallel to the original ray, except displaced. If you’ve ever tried to spear a fish from above the surface of a lake (hasn’t everyone?), you find that he’s not where he appears to be. You’ve got to compensate for refraction.
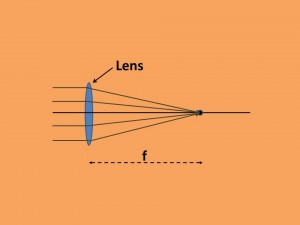
Figure 3 – Light from a distant point are parallel and focus by a lens a distance, f, called the focal distance from the lens
By shaping a lens appropriately you can design it so that all of the light from a distant object (physicists speak about an object at infinity, that’s the distant mountain that you are photographing.) to a point a distance f from the lens, called the focal point and focal length respectively. This is shown in Figure 3. Significantly, all the rays from the object are parallel and parallel rays go through the focal point. I say significantly because we can now consider the more general case where the object is somewhere other than at infinity.
Let’s continue our discussion of the technical basics of photography, building upon our discussions of the pinhole camera. As we’ve seen, pinhole cameras require tiny pinholes to create sharpness. As a result, they collect very little light. How do we solve this problem?
1/o+1/i=1/f.
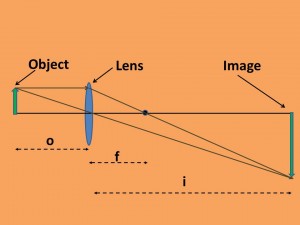
Figure 4 – Lenses cause and image of an object in front of the lens to form a distance i, called the image distance, behind the lens.
So let’s consider the omnipresent arrow again at some distance that we call o in front of the lens. A ray of light coming from the point of the arrow parallel to the center line, referred to as the optical axis of the lens, must pass through the focal point. A ray that hits the center of the lens passes right through it. These two rays cross.The other significant point is that the point the ray that strikes the center of the lens passes straight through it. The two rays cross a distance I behind the lens and form an inverted (aka upside down) image. This is referred to as the image distance. The relationship between o, i, and f is the so call “thin lens equation.Note that in the case that I have drawn the arrow becomes magnified. This is sometimes the case in macrophotography. The more typical; case is when the image becomes demagnified. A tree is usually a lot smaller as a picture than in real life. In any event the magnification, M, is given by
M = (image size)/(object size) .
And geometry teaches us that
(Object size)/(object distance) = (image size)/(image distance).
Finally, and as a result,
M = i/o = 1/(1/f-1/o)o.=1/(o/f-1).
If we note that in general, except for close-up macrophotography, the object distance is much larger than the focal length, the o/f is much greater than 1 so
M ~ 1/(o/f)=f/o.
We will use this simple relationship in a subsequent blog, where we will start to explore the important question of what sharpness can be achieved in a photograph with a given lens.
Let’s summarize what we have discussed so far in these technical blogs from a practical point-of-view.. Cameras typical give us the ability to control three things:
- We move the lens so as to change the lens position relative to the detector surface and thereby change what’s in focus
- We change the lens or the zoom that we are using so as to change the magnification
- We change the aperture so as to change the depth of focus.
The physical basis of these first two points has been given in this blog post. The physical basis of the last point was touched upon in our discussion of the pinhole camera and will be discussed in more detail in a subsequent post.




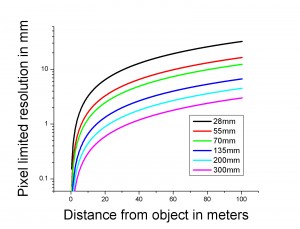


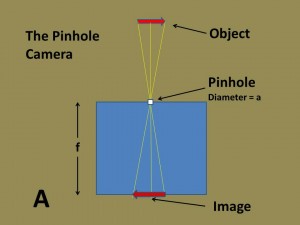
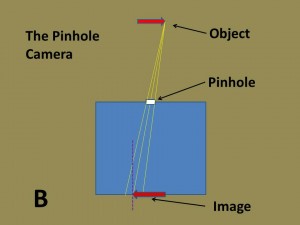 camera does its best job of image formation for an object at infinity and its worse for a point close to the aperture. Let me point out that lenses enable you to choose the distance for sharpest image, While for pinhole cameras this is always infinity. But it remains true that the smaller the f-number thr blurrier the image and the less “depth of focus” you have.